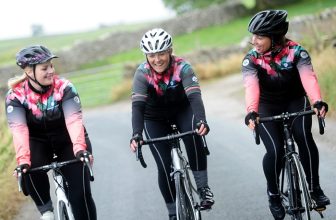
Advanced Cycling Techniques to Boost Your Competitive Edge
If you’re looking to step up your cycling game and add some serious sizzle to your speed, you’ve come to the right place. Whether you’re prepping for your next race or just want to leave your buddies in the dust on your weekend rides, mastering a few advanced cycling techniques can make a massive difference. Let’s dive into some tactics that can help you cycle faster, smarter, and more efficiently.
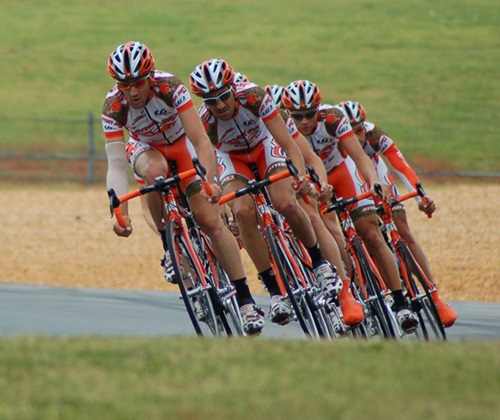
The Art of Drafting: Riding Smart and Saving Energy
What is Drafting?
Simply put, drafting is riding closely behind another cyclist to shield yourself from the wind. When you ride a bike, the biggest obstacle to your speed isn’t necessarily your leg strength, but the air resistance you face. By tucking in behind another rider, you can reduce that resistance significantly—some say by up to 30% or more. That means less effort and more speed!
Why Draft?
1. Save Energy: By using less energy to overcome air resistance, you can maintain higher speeds for longer periods without tiring as quickly.
2. Stay Fresh for the Finish: If you’re in a race or a long ride, drafting can help you conserve your energy for a final sprint or a tough climb.
3. Learn from Others: Riding close to more experienced cyclists lets you observe their techniques up close—like how they handle their bike in different situations.
How to Draft Like a Pro
Here’s how you can draft effectively, safely, and courteously:
1. Find the Sweet Spot: The ideal drafting position is about one to two wheel lengths behind the rider in front of you. Any closer and you risk a collision; too far and you lose the aerodynamic benefits.
2. Keep It Steady: Maintain a consistent distance between you and the cyclist in front. Sudden braking or abrupt accelerations can be dangerous.
3. Stay Alert: Keep your eyes on the rider’s back and be ready to react to their movements. Watch for signs like them looking over their shoulder or pointing out hazards—these are your cues about what’s ahead.
4. Communicate: Whether it’s with hand signals, calls, or head nods, communication is key in a drafting situation. Let the rider in front know you’re there and intend to follow their lead.
5. Take Turns: If you’re in a group, it’s good etiquette to take turns at the front. That way, everyone benefits from the draft and shares the workload.
6. Practice Makes Perfect: Like any cycling skill, drafting takes practice. Start in less busy environments with cyclists you trust and gradually work up to more challenging situations.
Things to Avoid
• Don’t Zone Out: It’s easy to get a little too comfortable in the draft, but always stay attentive to your surroundings.
• Don’t Get Too Close: Keep a safe braking distance. Remember, the closer you are, the faster your reaction time needs to be.
• Avoid Sudden Moves: Always signal your intentions and make moves gradually.
Drafting isn’t just a technique for racing; it’s a fantastic skill for any group ride, helping everyone stay together and conserve energy. As you get more comfortable with drafting, you’ll start to feel like part of a well-oiled machine, moving smoothly and efficiently with your fellow riders.
Pedal Like a Pro: Mastering Your Pedal Stroke for Smoother Rides
Why Focus on Your Pedal Stroke?
A smooth, efficient pedal stroke means you’re using less energy for more power. It reduces fatigue, increases your speed, and even helps prevent injuries by reducing strain on your knees and joints. Plus, it can make climbs feel a bit less like torture sessions and more like challenges that you’re equipped to conquer.
The Components of a Killer Pedal Stroke
1. The Downstroke (Power Phase): This is where the magic happens—where you push down on the pedal with the ball of your foot, engaging your quads, glutes, and calves. Imagine you’re wiping mud off your shoe; it’s a strong, deliberate push.
2. The Upstroke (Recovery Phase): Often neglected but equally important, the upstroke is where you lift your foot back up, readying it for the next downstroke. Engage your hamstrings and hip flexors to ‘peel’ the pedal back up.
3. The Transition: These are the brief moments when your foot is neither pushing down nor pulling up. It’s crucial to make these transitions smooth to maintain a consistent rhythm.
Tips to Perfect Your Pedal Stroke
1. Get Comfy with Clipless Pedals: If you haven’t already, consider switching to clipless pedals. They secure your foot to the pedal, which helps in efficiently pulling the pedal up during the upstroke.
2. Keep It Circular: Think of pedaling as drawing circles rather than just pushing down. This mindset helps engage more muscle groups effectively.
3. Practice Single-Leg Drills: Try pedalling with one leg at a time (safely on a stationary bike or trainer). This drill highlights weaknesses in your stroke and forces you to smooth out the dead spots.
4. Check Your Position: Seat height and position can dramatically affect your pedalling efficiency. Ensure your bike fit is dialled in by consulting with a professional or a seasoned cyclist friend.
5. Stay Relaxed: Keep your upper body relaxed. Tensing up wastes energy and can throw off your pedalling rhythm. Your legs should do the work, not your shoulders or arms.
6. Cadence Counts: A higher cadence (the speed at which you pedal) can be more efficient than a slower, more forceful stroke. Aim for around 80-100 revolutions per minute (RPM) as a general guideline.
Common Mistakes to Avoid
• Ignoring the Upstroke: Many riders focus solely on pushing down. Remember, pulling up is just as important.
• Overextending: Make sure your knee is slightly bent at the bottom of each stroke to avoid strain.
• Forgetting to Have Fun: Yes, technique is important, but so is enjoying your ride. Don’t get so caught up in perfecting your stroke that you forget why you’re on the bike in the first place!
Mastering your pedal stroke is a journey, not a destination. It’s something you can keep improving as you gain more experience and strength. So next time you hop on your bike, pay a little extra attention to how you’re pedalling. It might just transform your ride!
Conquer the Climb: Tips for Crushing Those Hills on Your Bike
Why Bother with Hill Climbing?
1. Strength and Endurance: Regular hill climbing builds muscle strength and cardiovascular endurance—two key elements of overall cycling fitness.
2. Mental Grit: There’s a mental component to conquering steep inclines that can make you a tougher rider both physically and mentally.
3. Scenic Rewards: Often, the best views are earned the hard way. Plus, what goes up must come down—think of the thrilling descent waiting on the other side!
Gear Up for the Gradient
Before we hit the slope, let’s talk gear:
• The Right Bike Setup: Lower gears are your best friend on a climb. If you’re frequently tackling hills, consider a bike with a good range of gears. For those steep pitches, having a granny gear can be a godsend.
• Tire Pressure: A slightly lower tire pressure can provide better grip as you climb, especially on looser surfaces.
• Lighten the Load: Extra weight can be a killer on climbs. Shed any unnecessary gear if you know you’re heading for the hills.
Climbing Technique: Stand Up or Sit Down?
1. Seated Climbing: Staying seated keeps your weight over the rear wheel, improving traction, especially on longer, steady climbs. Focus on maintaining a smooth, consistent pedal stroke and use your gears wisely—shift early to keep your cadence steady.
2. Standing Climbing: Standing up can give your legs a break and help you power over shorter, steeper climbs. It shifts some of the work to your upper body, letting you push down more forcefully. Just be aware that it uses more energy, so save it for those really tough spots or when you need to change up your muscle engagement.
Mastering the Mental Game
• Pace Yourself: Start slow. Many riders attack the hill too hard too early, only to burn out halfway up. Find a sustainable effort level and stick to it.
• Visualize Success: Break the climb into smaller sections mentally, and celebrate small victories as you reach each part.
• Breathe: Keep your breathing deep and steady. Oxygen is your muscles’ best friend on a climb.
Training Tips
• Practice Makes Perfect: The best way to get better at climbing is to climb. Incorporate hill repeats into your training regimen: climb up, coast down, and repeat.
• Cross-Train: Engage in other forms of exercise that strengthen your legs and core. Stronger muscles can make a significant difference in your climbing ability.
• Ride with Climbers: Nothing pushes you like trying to keep up with someone who’s a bit better at something than you are. Plus, they might have tips and tricks of their own to share.
On the Day of the Climb
• Hydrate and Fuel Up: Make sure you’re well-hydrated and have eaten appropriately. Climbing burns a lot of calories, and running out of energy mid-climb is a real bummer.
• Start Cool: If possible, hit the hill early in your ride or when you’re relatively fresh.
• Enjoy It: Yes, climbing is hard, but there’s joy in the challenge. Enjoy the process of testing your limits and improving.
Climbing hills might never be easy, but with these tips, you’ll definitely get better at it. And remember, the view from the top is always worth the effort.
Power Up Your Sprinting Game
Whether you’re sprinting to the next streetlight or toward the finish line in a local race, mastering your sprint technique can add a thrilling edge to your rides. Let’s break down how you can turbocharge your sprints and maybe even snag that unofficial neighbourhood KOM (King of the Mountain)!
Why Sprinting?
Sprinting isn’t just about speed; it’s about power, timing, and strategy. Here’s why it rocks:
1. Boosts Fitness: High-intensity bursts like sprinting improve cardiovascular health and can help increase your power output.
2. Breaks Monotony: Mixing sprints into your rides keeps things interesting and challenging.
3. Wins Races: If you’re competitive, a strong sprint can be the difference between first and second place.
Gear Up for Speed
Before we dive into technique, make sure your gear is on point:
• Proper Bike Fit: Ensure your bike is fit correctly. A good fit helps maximize power and efficiency.
• Suitable Gear Selection: Use a gear that’s heavy enough to provide resistance but not so heavy that you can’t turn the pedals quickly.
• Aerodynamics Matter: On sprint day, every little bit helps. Tuck in your elbows and streamline your profile to cut through the wind.
Sprinting Technique: Unleash Your Speed
1. The Build-Up: Start by getting into a comfortable yet fast pace. You want to be moving fast but not so fast that you’re already burning through your reserves before the sprint starts.
2. The Launch: When you’re ready to sprint, shift down to a harder gear and start ramping up your speed. The key is to explode with power. Drive hard with your legs, and really push and pull on the pedals.
3. Body Positioning: Keep low on the bike to reduce drag. Pull on the handlebars to help engage more of your body into the effort—not just your legs.
4. Breathing: Keep your breaths quick and deep. Oxygen is crucial here, so don’t hold your breath, even as the intensity kicks up.
5. The Final Kick: In the last few seconds of your sprint, if you can, push even harder. This is often where sprints are won or lost. Give it everything you’ve got!
Training Tips for Better Sprints
• Interval Training: Incorporate intervals into your training. Short bursts of high-intensity followed by periods of low intensity or rest are great for building sprinting power.
• Strength Training: Stronger muscles mean more powerful sprints. Focus on core strength and leg muscles.
• Practice Makes Perfect: Regular sprint practice is crucial. Try different lengths and intensities to build up your capabilities.
Mental Strategy
• Visualize: Before you start, visualize your sprint. Think about each phase and imagine executing it flawlessly.
• Stay Focused: Keep your mind on the sprint. Block out fatigue and focus on your technique and power output.
• Recovery: After a sprint, allow your body to recover properly. Ease up the pace and let your breathing stabilize.
Sprinting is a blast, and its amazing how much raw power and speed you can unleash with the right technique and training. Whether you’re sprinting for fun, fitness, or victory, every sprint is a chance to improve and push your limits. So next time you’re out on a ride, pick a point, and sprint for it. Happy sprinting
Mastering the Art of Tactical Eating and Drinking on Your Bike
A super important aspect of cycling that sometimes gets overlooked until it’s a bit too late: tactical eating and drinking. It’s not just about chowing down on a granola bar or gulping some water; it’s about fuelling your body right so you can keep those wheels spinning without hitting the dreaded wall. Whether you’re in for a long haul or pushing the pace on a shorter ride, getting your nutrition and hydration strategy dialled in can make all the difference.
Why Tactical Eating and Drinking?
1. Maintain Energy: Consistent intake of food and water helps maintain energy levels and prevents the highs and lows of sporadic fueling.
2. Optimize Performance: Proper nutrition enhances performance, enabling you to ride longer and stronger.
3. Recovery: Eating and drinking the right things at the right times helps speed up recovery, so you’re ready to go again sooner.
The Essentials of On-the-Bike Nutrition
Let’s break down what your body needs and when:
1. Carbs are King: For any ride over an hour, carbs are your main fuel source. You’ll want to consume easily digestible carbs regularly to keep energy levels stable.
2. Protein and Fats: For longer rides, include some proteins and fats to aid in sustained energy release. Just keep these to a smaller proportion compared to carbs.
3. Hydration: Staying hydrated is crucial, as even slight dehydration can reduce your performance. A mix of water and electrolyte drinks can help maintain the balance, especially on hot days or longer rides.
Timing is Everything
• Before You Ride: Aim to have a good meal rich in carbs and some protein about 2-3 hours before you ride. This gives your body time to digest and fuel up. Avoid heavy, rich foods that might sit heavy in your stomach.
• During the Ride: Start drinking early and often. As for eating, on rides longer than an hour, try to consume 30-60 grams of carbs per hour. This can come from energy bars, gels, bananas, or even specially formulated sports chews.
• Post-Ride: After you finish, try to eat something within 30 minutes. This should be a mix of carbs to replenish energy stores and protein to aid in muscle recovery. A smoothie can be a perfect post-ride recovery drink since it’s both hydrating and easy to consume.
Practical Tips for Eating and Drinking on the Move
• Easy Access: Keep food and drinks within easy reach. Use handlebar bags, jersey pockets, or bike frames designed for accessibility.
• Practice Makes Perfect: Eating and drinking while maintaining your pace can be tricky. Practice on less intense rides to get the hang of it without the pressure.
• Listen to Your Body: Learn to recognize your body’s signals for food and water. Feeling thirsty or hungry can already be a sign you’re behind on your intake.
• Adapt to Conditions: Hotter days or higher intensities mean you’ll need to adjust your intake. More water and electrolytes on hot days, more carbs on intense rides.
Common Mistakes to Avoid
• Overeating: Consuming too much too quickly can lead to stomach discomfort. Spread out your intake.
• Under-hydrating: Don’t wait until you’re thirsty. Drink consistently throughout your ride.
• Last-Minute Changes: Stick to tried and tested foods and drinks on ride day. Experimenting during a ride can lead to unexpected issues.
Tactical eating and drinking is all about keeping your energy and hydration levels just right so you can enjoy your ride to the fullest. It might take some trial and error to find what works best for you, but once you’ve got it figured out, you’ll feel the difference a solid strategy makes.